Thursday, April 14, 2011

Hunkydory domed flower cards

Aren't they beautiful? These cards are lovely, I think they'd make a beautiful centrepiece. The decoupage is all made of the same 300gsm silk-art card and so the flowers look really 'full'. These cards just use the standard items in the kit, but you could add extra butterflies or flowers, and I'm dying to make some as proper 'shaker cards' with lots of glitter. Fabulous!

Tuesday, April 05, 2011

A new perspective - To the Manor Born Tunnel Cards

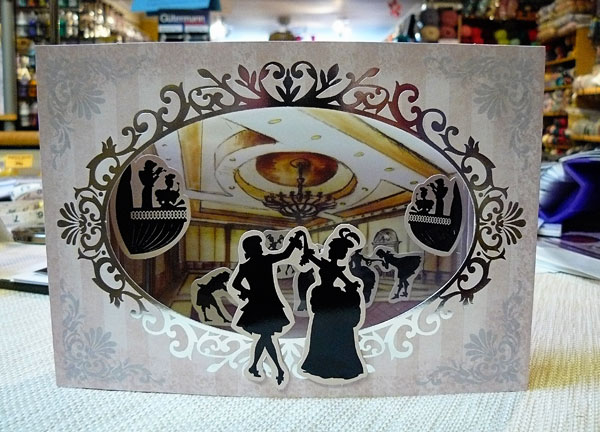
These tunnel cards follow the same kind of design as the Glimpse of Glamour cards, but with an added dimension - quite literally.
You get a set of figures in a range of sizes, so you can arrange them within the scene to create some really incredible perspective. The background papers also have a sharp vanishing point so you can really see the depth in the scene.


It takes some planning, as you need to think about which figures go where for the best effect. Once you've done one, you can soon see how it's supposed to work and then it's up to you to create these charming silhouette scenes.

Wednesday, March 30, 2011

Wedding invitations

We do love a wedding here at Wightcat, and not least because we love working with brides who make their own invitations. It can be really easy, and a lovely way to personalise your day. For brides (and those who are helping them!) who need a bit of inspiration, here are a few ideas:

I cut a background using a scalloped circle die, then layered it with mirri card and pattern card and topped it off with a greeting, some of our new paper roses and a pre-made bow. Despite the layers, it's super-quick, and you can get all these elements in colours to match your day.

We have some beautiful new Martha Stewart punches in (which are so new I don't even think they're online, so please contact for details) so you can create lovely border strips for a simple but elegant detail. The background is embossed card that I actually put through the Cuttlebug the wrong way, so it is de-bossed instead, but I rather like it. A happy accident!


This uses the same punch, but in black-on-white for a strikingly different effect. Any strong colour on white would look lovely.


And if you use the infinity loops punch on mirri card, and layer that on more mirri card, you get a super-glam look. I'm also loving the butterflies (another punch) which I think make a nice alternative to flowers, and the glittery ribbon. If you can't use glitter on your wedding invitations, when can you?!


If you are local, do pop in because we're always happy to help you come up with a creative solution that's perfect for you.

Saturday, March 26, 2011

Free Postage- This weekend only

Free UK Postage
This Weekend Only!
Spend £20 or more online at www.wightcat.com
& we will refund your postage
Offer ends at Midnight on Monday 28th March

www.wightcat.com

Friday, March 25, 2011

Lindsay Mason Clear Stamps

Lindsay Mason Clear Stamps
We’ve just updated our website with the complete range
Including some Mothers Day & Easter Sets...

Mothers DayTraditional Easter

Cute Easter

Contemporary Easter

Click Here

www.wightcat.com

Thursday, March 24, 2011

3 New Collections from La Pashe

Build a Blossom Collection – Series 2

Click Here
-----------------------------
Trinitage Collection – Series 2


Click Here

------------------------------

Nice and Easel Collection – Series 2


Tuesday, March 22, 2011

Brand new Hunkydory

Flight of Fancy Butterfly Toppers with Acetate Wings

Featuring pretty butterflies galore, these twin-packs include one high-quality topper sheet accompanied by a foiled 220micron acetate sheet, die-cut to the same outline as the butterfly toppers to be built up for extra dimension.

£2.25

Click Here
--------------------------------------------
Classic Cameo Die Cut Toppers

£1.50
--------------------------------------------
Radiant Roses Deluxe Mini Card Kits

£3.99
Each kit makes 4 complete cards
Click Here
--------------------------------------------
To The Manor Born Tunnel Card Kit

Each kit makes 4 complete tunnel cards
£7.99
--------------------------------------------
Radiant Roses DieCut Decoupage
£1.25

Monday, March 21, 2011

Clear Stamp Sets


Clear Stamp Sets
Brand New for Spring 2011
Only £5.99 each set


------------------------------------------------------------------
Characters & Images


------------------------------------------------------------------
Occasions


------------------------------------------------------------------
Shapes, Scrolls & Patterns

www.wightcat.com

Sunday, March 20, 2011

PCA Sale


SALE!


10% off selected PCA tools

Limited time


Saturday, March 19, 2011

Flora Doodles- Velvet Butterflies

Flora Doodles- Velvet Butterflies


12 Embossed Velvet Butterflies
Now in stock at Wightcat

Wednesday, December 15, 2010

Hey Rudolph

rudolph


Christmas means crafting here in Wightcat Towers, and so I present - Rudolph. A crocheted cutie currently available in the shop (he's not on the website so please email me if you're online). He also has a few snowmen pals to keep him company.

I think Monday was supposed to be the busiest posting day for Royal Mail...we have certainly been kept busy with parcels of all shapes and sizes. Wightcat Crafts is open until midday on Christmas Eve, but don't forget that the last posting date for 1st class items in the UK is 21st December.

k x

Friday, November 26, 2010

Christmas Tree

Since putting my Ribbon Tree up in the shop window we've had lots of people asking about it so I thought I'd pop a few pictures up for you all to see...its really easy to make and you can do it with glittery ribbons like I did, or you could cut strips of pretty papers to use instead.

All you need is a Polystyrene cone ... (cones, & ribbons available from our shop). I painted the cone first, that way if you miss a few places it will still look pretty. Below, you will find a few simple instructions and if you need any help, just place a comment and we will reply.


Depending on how close you pin your ribbons you will need around 13-14 metres of ribbon. Cut these into 4 inch (about 10 cm strips). Very gently mark a line around the base of the cone about an inch up from the base....you can just about see it in the picture, then fold your ribbons and pin around the cone (I used 2 pins for each piece of ribbon)


Gradually work up the cone leaving about an inch between layers and finish with a little cone on the top (see finished tree picture)


Hope you enjoy making this, have fun :)
Hilary x


Tuesday, November 23, 2010

Hunkydory Glimpse of Glamour cards

glimpse of glamour

The newest offering from Hunkydory is these Glimpse of Glamour expanding tunnel cards.

glimpse of glamour

They use a cleverly folded side panel and sheets of acetate to create a layered image with amazing depth.

glimpse of glamour

They are 8x8 in size and look both complicated and expensive. They're neither. It's just £2.49 for a kit which contains everything you need to make two cards. And although they look difficult, they are pretty simple to make really. There's an instruction sheet in each pack. I was going to do a step-by-step tutorial but there were so many photos I ended up turning it into a little slideshow for you:

I quite enjoyed making this, but I have already seen lots of things I would like to improve! This is very much a first attempt at a slideshow tutorial, so please be kind. If you have any suggestions for future tutorials then I would love to hear them!

glimpse of glamour

There are two scenes in each pack and each one is a little scene of luxury. Like all the Hunkydory kits they are made of great quality cardstock with well-made die cut images.

glimpse of glamour

Enjoy!

Thursday, November 18, 2010

One stamp, two styles

one stamp, two styles

I love stamping, but I'm always on the lookout for ways to make my images look different. I thought I'd use the same stamps I made this card with to show you how to achieve two very different looks.

closeup - stazon on mirror card

Here, I've used the Christmas tree from the set and stamped it on mirri card using Stazon ink. You need to stamp carefully because the smooth surface of the card can cause the stamp to slide - place it on, press down and lift off straight to get a clean impression. It dries really quickly, and then I used Stickles glitter glue to create neat baubles. The greeting was stamped and embossed in blue - not a traditional Christmas colour but it contrasts nicely with the red on the tree.


closeup - copper embossing powder on brown

For the second card, I stamped the tree onto brown cardstock and embossed it using copper embossing powder. It has a much more rustic feel and catches the light nicely. I stamped the greeting on to a piece of paper from an old book to add to the vintage feel. String or raffia would have made a nice bow as well, but I settled for a neutral ribbon as that's what I had in my stash.

There you have it - two different styles using the same stamp. Happy crafting!

K x

Saturday, November 13, 2010

Christmas wreaths

09web

I love making Christmas decorations, and these wreaths are a crafty twist on a classic.

01web

I used this wool to wrap around a polystyrene base. The smaller base only needs around 30g of wool, so it's a great way to use up scraps. You'll need more if you use a thinner yarn.

02web

Use a pin to secure the first part of the yarn.

03web

Keep going around the ring, keeping the yarn tight. You might want to use a few extra pins to hold it in place, but you shouldn't need to put too many in. I used half a dozen for the whole ring.

04web

Because of the shape of the ring, you might need to pull the yarn a little tighter on the inside to make it lie smooth.

05web

Finish and secure with another pin. Tuck the end of the yarn in.

06web

Cut another piece of yarn and loop this around...this will be what you hang the wreath with. (You can use this to cover up any loose ends of yarn).

07web

Two colours of yarn are also effective - use traditional Christmas reds and greens, or go for something more unusual. My orange and yellow wreath is more autumnal than Christmassy, but it fits nicely with the colours in my house.

08web

And to decorate! I made 'flowers' by cutting three circles of felt, and stitching them together with a button in the middle. You could cut flower shapes, use buttons on their own, or use flowers made of silk or paper.

10web

I used curling ribbon to fill in the gaps between my flowers. Cut several short strips and tie them around the ring, then use scissors to 'curl' the ribbon.


11web

On my larger garland, I used crocheted flowers instead. These take a bit more effort to make but add to the rustic feel of this wreath. I used curling ribbon again, and the bow on the top is ribbon with a wire edge.

At the moment all the elements are secured with pins. Once I've decided that I'm happy with the placement, I'll use a glue gun to make sure they are well and truly stuck on.

Happy crafting!

Kate x

LinkWithin

Related Posts Plugin for WordPress, Blogger...