Showing posts with label cards. Show all posts

Friday, June 17, 2016

Easy Emboss Stained Glass Templates

Thought I'd show you a few examples of the lovely Stained Glass EasyEmboss Templates from PCA. Like all the templates they are really versatile and you can infill them and just use parts of them, mixing and matching as you go.

What a great way to do your parchment!  You can find them all here on our website


So here's the Daisies template, the first picture is just how it looks when you have used the template to make your outline on your parchment paper, and the second picture is coloured using FaberCastell Polychromos pencils, some have been blended on the back with Dorso oil and then the colour has been enhanced on the front.

Here are some more examples of some of the other templates


So many different ways of using these templates


Here are 2 examples of the same template, completely different styles. These two butterfly cards were made by Karen from our design team. The card on the left had been infilled with traditional gridwork and the butterflies have been worked separately and layered as 3D

There are more templates available here if you make any cards from them, please send us a picture we would love to see it :)

Happy Crafting

Hilary x


Wednesday, April 29, 2015

Stamping Resist Techniques

I love being able to do so many different crafts, and really enjoy stamping.  This week we were playing with resist techniques and came up with a few different cards......this is one of them.  So I thought I would jot down a step by step for you to follow if you have never done this technique before.

 
You will need:

A butterfly stamp - I used IndigoBlu
A mask/stencil of your choice......we have lots of different ones in the shop and on the website
Also, IndigoBlu Stamp Cleaner, which I think is brilliant and used to clean my stamps and stencils

Start by taping the mask/stencil onto a piece of white card

Cover the card with Versamark through the mask.  Keep the ink pad flat and press hard to make sure you get a nice coverage, if you miss some areas it won't matter.  Remove the mask.

Cover the area with WOW clear gloss embossing powder, and melt it using the heat gun. 
 Trim off the outer edges.
Colour the card with the Distress Ink Pads, using the mini ink blending tool, these are great little tools and the little ink blending foam fits into the bottom of the mini distress inks so you can have one for each colour.

Run the Quickie Glue pen around the lines and circles and add some UltraFine Glitter

Next, you will need another piece of white card, approx 10.5cm x 15m .  Trim your resist piece of card to fit over half of it.  Colour half of the white piece with the mustard seed distress ink.

Attach the resist piece of card to the coloured white card, stamp the butterflies with the Stazon Ink pad (Rusty Brown) and then cover the join with some ribbon.  Mount this onto a slightly larger piece of green card 

Take your folded base card and colour around the edges with your distress inks, fold the card and colour the folded edge as well.

Mount the cards together, add a bow and a sentiment

I like to stamp the insert to match the  design on the front

Finally, don't forget to add your name on the back.....your artwork should always be signed :)

I hope you enjoy this mini tutorial, let me know how you get on

Happy Crafting


Sunday, April 26, 2015

Creative Stamping Issue 24 April 2015

How thrilling to see my Window Box card published on the front page of the latest Creative Stamping Magazine.


If you haven't bought this magazine before, it comes with a wonderful set of stamps and lots of ideas on how to use the stamps


We hold regular craft workshops at the shop, please pop in and see us or give us a call if you would like to join us.

Happy Crafting!


Monday, January 23, 2012

Hunkydory Lady in Red

Some Hunkydory kits look more enticing than others, and when I first looked at the packet for these Lady in Red luxury cards I wasn't too sure how they were going to turn out.

I needn't have worried.


These kits are gorgeous. I say it every time, but the quality of Hunkydory kits is astounding. The silk cardstock is thick and glossy, and the cards are all pre-scored so they're easy to fold.  


The silver foil edging is really hard to photograph, but trust me - it looks fabulous. And I think these illustrations are really beautiful. (I love red shoes.) 


These are the pyramage cards, with four layers to each image. There are four designs in the pack.
But wait!

The leftover images from the pyramage cards....make the invertage cards.

I know it was late at night when I was putting these together, but I thought that was pretty clever.


The same four designs are repeated, and this time instead of the stepped card, you get a box and frame to put these in. Each box has a foldout piece on the back so it will stand upright, and a hook so you could even hang it on the wall.


I just love these cards, I think they're quite beautiful. After all the sweetness and light of Christmas, these monochrome cards with a splash of red look stunning.

I don't normally post about prices on the blog, but I just wanted to let you know that this kit which makes 8 cards is currently only £6.99, which I think is a real bargain.


Kate x


Friday, January 13, 2012

More Art Deco ladies in decoupage

These are my favourite. Maybe that's why I'm saving them till last?

All these cards are on 4x4 blanks, so the image itself is only about 3x3. Beautiful.


Mirror card is really difficult to photograph, but there are gold highlights on all these decoupage images, so I had to use some as a mount.


These cards don't even need a greeting, I think. Just lovely as they are. I double-mounted this one but that's as much 'extra' as it needs.


This one is my favourite of all. I used some embossed card, but you could run a background through the Cuttlebug for extra texture.

Thanks for sharing my decoupage ladies!

Kate x

Thursday, January 12, 2012

Art Deco Die Cut Decoupage

Oh gosh, I wish fashion was still this glamorous.

 Also, I wish I was this thin and elegant!
 And hats! Can we bring back cloche hats?
I think this one is best kept for special occasions only, though. Imagine turning up to work in that!

You can find this decoupage sheet here.

My final group of elegant ladies will be appearing tomorrow!

Kate x

Wednesday, January 11, 2012

Polka dot decoupage cards


These decoupage flowers are some of our new stock for January. They are die-cut and super quick to assemble.
Because they are so simple, at first I couldn't think how to arrange them on the card without any kind of background shape or element.
Then I realised that actually, this was perfect for me to add my own backgrounds and greetings, and make a much more varied range of cards.
I love how this banner looks like it's floating, but actually it's just using silicone glue instead of 3D pads. (Shameful crafting admission: I've only just started using silicone glue, that stuff scared me!)

You might also notice that these cards have a watermark on. There are so many websites out there that take images and use them as their own - and even places like Pinterest where people blog images without the original source - that I felt it was about time I laid claim to my own work. I really hope that these images inspire you to get creative. And if you post your own work online, you can find out how to make your own watermark brush in Photoshop here. 

I've also been trying out the Art Deco Decoupage that's new in the shop...that'll be up on the blog tomorrow!

Kate x

Saturday, January 07, 2012

New Die Cut Decoupage


Hello,

I’ve been putting the first of the new products for the year up on our website today.

We have 2 new Die Cut Decoupage series. They are in stock & available right now in the shop.

There is the Art Deco Series & the Polka Dot Flowers Series….with a special offer to buy the complete set in each range.


Art Deco Die Cut Decoupage


Polka Dot Flower Die Cut Decoupage


Hope you like them

Thursday, January 05, 2012

Pinterest inspiration to life

Phew! I can't believe Christmas is over. I feel slightly bloated from eating far too much chocolate, and totally ready for a new year of creativity.

Have you heard of Pinterest?

In case you haven't, it's a website for collecting links to all sorts of inspiration. A bit like the corkboard I used to have pinned up by my desk...except this is all online and so each image links back to the original source.

Pinterest is a great place to spend hours collecting inspiration...but I wanted to make sure that I did something with all of this eye candy. So, I present: Pinterest to life. I'll show you how I've used an image from Pinterest to create something myself.

Check out this image on my Pinterest board. These lovely cards are by Danielle Flanders. Simple, colourful...you can practically hear my brain whirring with ideas.


And here's my version. I used a coloured card blank, and rounded the corners of the white card front. Then I used a collection of flower stamps across the card, stamping right over the edges. I only have small sentiment stamps, so instead of putting the greeting over the flowers I used the white space at the top. I left off the machine stitching, and replaced the string with ribbon, because that made the card more 'postable'. The colours I've used are much softer and more autumnal, as those are the inks I had to hand.

I love Pinterest for ideas, but I love it even more when I can use those ideas to make something of my own. I want to spend less time reading website and more time making things. This is just the start!

Kate x

If you'd like to 'follow' me on Pinterest, you can find me here.

Tuesday, July 05, 2011

I've missed you


My presence on the internet has been quiet these last few weeks, but here in the land of bricks and mortar it's been plenty busy. How, you ask?


  • We've had a move around in the shop. Our new layout gives us space for small workshops, more space for crafting essentials, and a better position for the wool and yarn. Good news all round. Say hello if you pop in!

  • Hilary and Steve went to Bristol for the South West Parchment Craft Exhibition. A lovely chance to catch up with everyone, share work and show off some new patterns.

  • There are some new goodies in the store...starting with a range of photographic greetings cards by yours truly :) I love design, and thought it was about time I did something useful with my thousands of photographs. The picture above is just a taster.

  • We started stocking Christmas decoupage. Wait, did I just write that? Yes folks, it's true. The hottest days of the year so far must mean it's time to start your Christmas cards.

  • 44 colours of Stickles glitter glue. You know I love anything sparkly.

That's enough for now, isn't it? I'll be back soon with some more crafting inspiration. Promise.


K x

Thursday, April 14, 2011

Hunkydory domed flower cards

Aren't they beautiful? These cards are lovely, I think they'd make a beautiful centrepiece. The decoupage is all made of the same 300gsm silk-art card and so the flowers look really 'full'. These cards just use the standard items in the kit, but you could add extra butterflies or flowers, and I'm dying to make some as proper 'shaker cards' with lots of glitter. Fabulous!

Tuesday, April 05, 2011

A new perspective - To the Manor Born Tunnel Cards

These tunnel cards follow the same kind of design as the Glimpse of Glamour cards, but with an added dimension - quite literally.
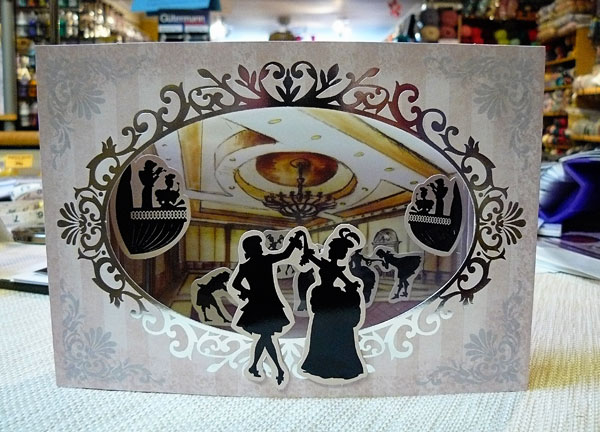
You get a set of figures in a range of sizes, so you can arrange them within the scene to create some really incredible perspective. The background papers also have a sharp vanishing point so you can really see the depth in the scene.


It takes some planning, as you need to think about which figures go where for the best effect. Once you've done one, you can soon see how it's supposed to work and then it's up to you to create these charming silhouette scenes.

LinkWithin

Related Posts Plugin for WordPress, Blogger...