Merry Christmas everyone, thank you for your friendship and custom, and for making this the best year ever! We look forward to seeing you in 2016, Hilary & Steve, Wightcat Crafts x
Thursday, December 24, 2015
Saturday, May 09, 2015
My Favourite Things.....
I'm humming the tune as I'm typing (yes, I really do love my work)
Raindrops on Roses
Whiskers on Kittens
Brown paper packages tied up with strings
These are a few of my favourite things......
With that in mind I thought I'd write about some of my favourite crafting 'things', I'm sure we all have them and I'd be really interested to know what you love using the most and what you can't do without when it comes to our crafting
As you all know, Parchment Craft is one of my all time favourites, it's something I can sit down to and just forget about everything else that's happening around me, mostly for the good but sometimes not so good because I really should be doing something else......that's what happens when you own a craft shop
Of course, I can't do anything without our lovely Wightcat own brand Parchment paper so I guess I should mention that first, at 140gsm it is great to work with, I use it in all my classes as well and at half the price of well known brands, I'm sure you will like it too.
.....another one of my really can't do 'withouts' (is that a word?) is my Parchment Protector, of course you could just use a piece of kitchen paper but apart from keeping any marks off my parchment as I work, it also keeps it nice and flat and stops it getting any dents, it also has a nice semi circle taken out of it and when I'm perforating I keep it over where I'm working and it holds my work beautifully so I can get the tools 'in and out' easily. You can just about see it in the picture.
Whilst I'm talking about my Parchment Protector, have you seen the new templates from PCA. Some Wedding ones and some for men's cards, they are lovely and so easy to use.
Oh gosh, now I've started I can think of a whole host of things I love using, and I shall mention just one more before I get carried away
.....my one needle tool (that's in the picture too).....this gets used for so many things including the placing of sticky gems, even unbunging bottles, apart from perforating my parchment and grid work, although I do keep a separate one especially for this :)
More next time......
until then, Happy Crafting and please add a comment with some of the things you love using or couldn't do without
Wednesday, April 29, 2015
Stamping Resist Techniques
I love being able to do so many different crafts, and really enjoy stamping. This week we were playing with resist techniques and came up with a few different cards......this is one of them. So I thought I would jot down a step by step for you to follow if you have never done this technique before.
You will need:
A butterfly stamp - I used IndigoBlu
A mask/stencil of your choice......we have lots of different ones in the shop and on the website
Also, IndigoBlu Stamp Cleaner, which I think is brilliant and used to clean my stamps and stencils
Start by taping the mask/stencil onto a piece of white card
Cover the card with Versamark through the mask. Keep the ink pad flat and press hard to make sure you get a nice coverage, if you miss some areas it won't matter. Remove the mask.
Cover the area with WOW clear gloss embossing powder, and melt it using the heat gun.
Trim off the outer edges.
Colour the card with the Distress Ink Pads, using the mini ink blending tool, these are great little tools and the little ink blending foam fits into the bottom of the mini distress inks so you can have one for each colour.
Run the Quickie Glue pen around the lines and circles and add some UltraFine Glitter
Next, you will need another piece of white card, approx 10.5cm x 15m . Trim your resist piece of card to fit over half of it. Colour half of the white piece with the mustard seed distress ink.
Attach the resist piece of card to the coloured white card, stamp the butterflies with the Stazon Ink pad (Rusty Brown) and then cover the join with some ribbon. Mount this onto a slightly larger piece of green card
Take your folded base card and colour around the edges with your distress inks, fold the card and colour the folded edge as well.
Mount the cards together, add a bow and a sentiment
I like to stamp the insert to match the design on the front
Finally, don't forget to add your name on the back.....your artwork should always be signed :)
I hope you enjoy this mini tutorial, let me know how you get on
Happy Crafting
Sunday, April 26, 2015
Creative Stamping Issue 24 April 2015
How thrilling to see my Window Box card published on the front page of the latest Creative Stamping Magazine.
If you haven't bought this magazine before, it comes with a wonderful set of stamps and lots of ideas on how to use the stamps
We hold regular craft workshops at the shop, please pop in and see us or give us a call if you would like to join us.
Happy Crafting!
Labels:
cardmaking,
cards,
crafts,
Creative Stamping,
rubber stamping
Saturday, December 20, 2014
All things Christmassy!
Are you ready for Christmas?
Everyone is so busy in our household, Steve put up most of the decorations in the shop a while ago and Amanda decorated the tree at home last night so its all beginning to look very festive :)
Most of the presents are wrapped but if anyone has tried looking to see what is theirs, then they will be disappointed because none of them are labelled yet. I just hope I remember which is which when I attach all the labels otherwise it will be like a lucky dip!
I've finally made the labels and here they are just in case you still need a little inspiration ..... you could use any stamp that you have in your stash.
Make a background of your choice, I love using distress inks for backgrounds and using the little ink blending tool makes it so easy
Then flick a few water drops over the ink, you can just about see the water on the next picture, I used my fingers to flick the water, but you could use a spritzer bottle or old toothbrush
Everyone is so busy in our household, Steve put up most of the decorations in the shop a while ago and Amanda decorated the tree at home last night so its all beginning to look very festive :)
Most of the presents are wrapped but if anyone has tried looking to see what is theirs, then they will be disappointed because none of them are labelled yet. I just hope I remember which is which when I attach all the labels otherwise it will be like a lucky dip!
I've finally made the labels and here they are just in case you still need a little inspiration ..... you could use any stamp that you have in your stash.
Make a background of your choice, I love using distress inks for backgrounds and using the little ink blending tool makes it so easy
Then flick a few water drops over the ink, you can just about see the water on the next picture, I used my fingers to flick the water, but you could use a spritzer bottle or old toothbrush
Place a paper tissue over the whole piece and dab the excess water off and wait for it to dry or use a heat gun to help it dry if you are in a hurry. I love this effect!
Next, take any Christmassy stamp, I used a lovely Christmas Tree by IndigoBlu. Stamp the image with Versamark and using Wow! Embossing powder, Opaque Bright White and a heat gun, emboss the image.
Then I ran lines of glitter around the image with Stickles, I used Diamond but Fruit Punch looks nice on the red too. I hope you can see the glitter on the picture it looks so effective.
Finally, punch a hole if you haven't already and thread some ribbon........Ta Dah! .....all done!
Have a lovely Christmas
Labels:
christmas,
craft,
crafts,
distress ink pads,
embossing,
embossing powder,
festive,
Gift tag,
inspiration,
labels,
Natale,
Noel,
Ranger distress inks,
rubber stamping,
stamping,
stamps,
stickles,
tags,
techniques,
Wow!
Saturday, November 29, 2014
Multigrids
Well it's high time we had an update. It's a bit early for New Year resolutions and being only a small team (mainly myself and Steve) it's quite difficult prioritising what needs to be done first but I really must make sure this is regular occurrence!
As you all know, you will find us on Facebook. But after all this time, I've suddenly realised that if I post here, I can always share it to our other pages so perhaps that's how we should continue.
Parchment Craft is one of my passions and a great way to start this craft is by
using some of the metal grids that have been brought out in recent years, there is such a variety of themes and of course Christmas is included.
We have a very special offer on Multigrid 21 for this weekend only and it is just £5.00!
So if you've never tried using one of these grids, here is the ideal opportunity! (This offer will be only available until Midnight Monday 1st December (GMT)
We used this particular grid in our 'make & takes' for beginners when we visited Westpoint, Exeter, this year, just making simple bookmarks. Wow! they turned out great and they were really easy to make, these samples were made by Lesley from our design team (whose link I will add very soon)
These make simple gifts and look stunning when presented in the bookmark sleeves, which you can also find on our website.
Of course, you can use these grids to make your design as simple or as challenging as you like!
Here is a decorated box made by one of the ladies from my Parchment class,
again, she has used Multigrid 21.
Have a great weekend!
~Hilary~
Thursday, December 20, 2012
Competition Winner
We are pleased to announce the lucky winner of our December competition is Julie Smy, she will be receiving a whole load of parchment goodies worth over £50. We will be doing more competitions in the new year so watch out for them and don't forget to like our Facebook page
Labels:
competition,
craft,
facebook,
parchment,
Pergamano,
Wightcat Crafts
Friday, October 12, 2012
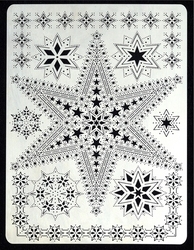
Perforating Grids, Multi Grids & Siesta Grids Guide
As the title suggests, there are a few different grid
variations to choose from.
Generally, if you are talking about a grid for parchment craft then
you would be talking about a Straight Grid. This is a grid with holes all the
way over it, all at equal distances from each other in vertical/horizontal
lines.
There are 2 versions, fine and bold and they have different
names depending on the brand of the grid.
The only difference between the fine
and the bold grids are the size of the holes, the needle you use should fit the
hole nicely so when you pierce the parchment through the hole and make a
perforation, it becomes a nice round perforation and every hole you make will
be the same. So, if you were to use the bold grid then you will need a slightly
thicker needle than the fine grid.
You will also see on the market the older type mesh grids,
that are perfectly good to use although it’s more difficult to get uniform
perforations because of the ‘movement’ in the mesh.
How to use a plain
Grid
As you can see from the picture below, you can use a grid to
make perforations in your parchment and also to emboss dots and it is exactly
the same whichever grid you use.
If you have ever done
cross stitch, counting across your pattern to work your stitches on open weave
embroidery material, then you have a slight advantage for using grids as a
counting method is used to transfer your pattern to your parchment exactly the
same way as in cross stitch. Saying
that, it is not difficult and with a little practice you will be on your way.
To way to use a plain or diagonal grid place your parchment
on the top of the grid and tape it down. Put your pattern to the side of your
work so you can count the holes according to the pattern and perforate using a
single needle tool .
In the following example the black dots (Fig 1) are
perforations on the front of the parchment, (the white holes are just the
background holes of the grid)
(Fig 2) shows where you would emboss with the PCA sun tool
(Pergamano star tool) to make the circular embossed dots (on the back of the
parchment) and then where you cut with the scissors to make the octagonal
shaped holes shown in (Fig 3)
Then are also a multitude of various ‘fancy grids’ like the
Pergamano multigrids and Siesta Grids. These are much simpler to use as they
already have patterns and borders on them, eliminating the need for counting.
How to use a Multi
Grid
Place your parchment on top of your grid and tape it down.
First of all you emboss the sections you would like to
emboss and then turn the grid over leaving the parchment in place and perforate
through the holes according to the pattern.
The example below is of Pergamano multigrid 21, available
from Wightcat Crafts www.wightcat.com
It is a sampler made from the complete grid, made by my
friend Maggie Byford, this is to show how the whole grid would look but also,
to show how you can take parts of it for your own parchment work, not
forgetting that you can make extra layers for a 3D look.
Extra samples below are from the girls in my classes, one of
them used the grid to make segments to cover a box which looks fantastic. There
are also a couple of cards to show how you can use it to make your own cards as
well by adding glitz and glitter to give that extra bit of sparkle.
Sunday, October 07, 2012
Good News!!!
Update from Wightcat Crafts
Good news!! www.wightcat.com is back up and running, there was a technical problem with the servers so all is well. Even so, the site is very secure and no personal details are ever stored on the website so there is no risk to our customers :)
Important Information from Wightcat Crafts
Someone has hacked into our website and we are trying to sort it out, please be patient, in the meantime our new website will be www.wightcatcrafts.com which will be up online within the next 48 hours. If anyone needs to contact us please email wightcat@hotmail.co.uk
Friday, October 05, 2012
Paper Folding with Pretty Papers
I love pretty papers, and we have so many pretty papers, including parchment papers and vellums, in the shop that I thought I'd play around a do some paper folding which seems to be in my mind at the moment. I happened to be surfing around the Internet...as you do....and saw something like this on my travels so thought I'd have a go with some pretty pink flower fairies vellums. I used A4 papers for the back so its actually quite large, measuring about 50cm in diameter, but of course it can be made a lot smaller and I thnk a teeny weeny one would make a great embellishment for a scrapbook page or a card, but this one is perfect to hang in the shop window.
Labels:
cardmaking,
decorations,
Papers,
parchment,
scrapbooking,
vellum,
Wightcat Crafts
Tuesday, July 24, 2012
Latest News!
Winners of the Prize Draws we had at our recent Parchment Craft Exhibitions
Harrogate Exhibition
S. Hunsley from Hull
E McCain from Tyne & Wear
Bristol Exhibition
May Neilson from Exmouth
Dawn Stephens from Finchley
Tuesday, July 10, 2012
PCA templates
I have started using the new PCA Templates, and they are so easy to use. This sample above is using the pansies from Christine Colemans pattern pack 31 using one of my favourite colouring techniques, dry pencil colouring with fabercastell polychromos pencils and then I used several of the PCA templates to do the surrounding border.
I used TP3102E which is a variety of different sized ovals....this one is great to be able to emboss an oval all in one go without any glitches!
Then I used the Scrolled Rectangle border TP3117E, this is the 2 outer rounded corner rectangles with the scrolls in the middle, again it has various sizes, so you could use it in the middle of a card too if you wanted.
Then I filled in with cross hatching, again using another template, Fine Cross Hatch Diagonal, TP3151E and VOILA!! My card was finished :) Hope you like it!
Tuesday, July 03, 2012
We have started
updating our website, so far this week we have added the new Perga Colours
which we were lucky enough to get in time for Bristol and we now have in stock
at the shop.
I have been
playing with my new set and I have to say, they are really nice. There are 30
colours in the box, (10 more than the old packs) and they are also dual ended
so you can get into all those tiny spaces as well.
http://www.wightcat.com/crafts/perg-pens.htm
Wednesday, February 22, 2012
Things that make me go 'yum'
Sorry folks, this was Saturday's post from the shop that got missed.
Really, I wanted to share with you our display of new Parchment products. The first lot came in and whizzed out again for pre-orders, but there are some on the shelves now.
I don't really do parchment (well, ok, I don't do parchment at all). But the vellums and papers really caught my eye, and the stamps are also delicious. Can I say 'delicious' to describe stamps? They totally make me go 'yum'.
In other news, Hilary and Steve have recently been visiting trade shows and looking at new products. Crafting has changed a lot over the last few years, especially as the economy has tightened and everyone is feeling the pinch. I think we are all looking for the best value for our money, getting the best products we can as well as ways to stretch our crafting supplies. The good news is that there has been lots to see at the show, and I think our ranges in the shop will start reflecting some of these new trends and techniques - and always with an emphasis on value.
Speaking of shows, of course, we go to the trade shows as attendees because we're retailers. But if you are coming to Bristol or Harrogate (more details on our home page ) then we will be there complete with shop.
We spent this evening choosing colours for a new range of 12x12 cardstock. It's been a while since we updated and there are some fantastic tones out there. I am really excited to get my little hands on it for some scrapbook pages. Things that make me go 'yum', indeed!
Really, I wanted to share with you our display of new Parchment products. The first lot came in and whizzed out again for pre-orders, but there are some on the shelves now.
I don't really do parchment (well, ok, I don't do parchment at all). But the vellums and papers really caught my eye, and the stamps are also delicious. Can I say 'delicious' to describe stamps? They totally make me go 'yum'.
In other news, Hilary and Steve have recently been visiting trade shows and looking at new products. Crafting has changed a lot over the last few years, especially as the economy has tightened and everyone is feeling the pinch. I think we are all looking for the best value for our money, getting the best products we can as well as ways to stretch our crafting supplies. The good news is that there has been lots to see at the show, and I think our ranges in the shop will start reflecting some of these new trends and techniques - and always with an emphasis on value.
Speaking of shows, of course, we go to the trade shows as attendees because we're retailers. But if you are coming to Bristol or Harrogate (more details on our home page ) then we will be there complete with shop.
We spent this evening choosing colours for a new range of 12x12 cardstock. It's been a while since we updated and there are some fantastic tones out there. I am really excited to get my little hands on it for some scrapbook pages. Things that make me go 'yum', indeed!
Labels:
bristol,
exhibitons,
harrogate,
paper,
parchment,
parchment craft,
Pergamano,
stamps,
vellum
Saturday, February 11, 2012
Saturday at the shop
Gosh, hello there.
The last couple of weeks have whizzed past...and now we seem to be in the grip of the frozen winter that we thought we'd missed. Perfect weather for crafting, though.
I've been a bit slow on the sample front as I am now studying a new course and it's taking me a while to work out how to fit everything into my day! But that doesn't mean the shop is quiet...oh no.
FaberCastell Polychromos pencils are restocked and now sold individually. Just the display makes me happy. There's something about colours in order, isn't there?
The last couple of weeks have whizzed past...and now we seem to be in the grip of the frozen winter that we thought we'd missed. Perfect weather for crafting, though.
I've been a bit slow on the sample front as I am now studying a new course and it's taking me a while to work out how to fit everything into my day! But that doesn't mean the shop is quiet...oh no.
FaberCastell Polychromos pencils are restocked and now sold individually. Just the display makes me happy. There's something about colours in order, isn't there?
And this is so new it isn't even online yet...Sublime Egyptian cotton DK. I am so in love with this I can't tell you. My self-imposed yarn ban (until I finish the two projects that are currently in progress) is going to fail, I can tell you. Every single colour is beautiful, and the yarn has the most gorgeous sheen.
In the meantime....Mindy also has new colours and patterns in Sirdar Click, and I can vouch for the feel of this yarn as I'm wearing it right now.
Enjoy the rest of your weekend!
Kate x
Monday, January 30, 2012
Changing colours
I'm never really ahead of the curve on craft trends. It always takes me a while to get in to something, and so it took me a while to get in to Promarkers.

And while I'd heard that you can use them to re-colour other things (like gems, and peel-offs, and stickers) I had never tried it. But my friend is getting married and I'd offered to make the invitations, and on the sample I'd used a pretty pink gem. She loved it - which was great - except I ran out.
So thank you Mum and Mindy, for reminding me that I could use a pink Promarker to turn my little clear gems into perfect pink ones.
And then I realised that the white alphabet stickers that didn't work on my scrapbook page, would look perfect if they were pink. And in doing so, completed what might be the longest scrapbook page ever. Thankfully, I love it. That perfect pink was worth waiting for.
Monday, January 23, 2012
Hunkydory Lady in Red
Some Hunkydory kits look more enticing than others, and when I first looked at the packet for these Lady in Red luxury cards I wasn't too sure how they were going to turn out.

I just love these cards, I think they're quite beautiful. After all the sweetness and light of Christmas, these monochrome cards with a splash of red look stunning.
I don't normally post about prices on the blog, but I just wanted to let you know that this kit which makes 8 cards is currently only £6.99, which I think is a real bargain.
Kate x
I needn't have worried.
These kits are gorgeous. I say it every time, but the quality of Hunkydory kits is astounding. The silk cardstock is thick and glossy, and the cards are all pre-scored so they're easy to fold.
The silver foil edging is really hard to photograph, but trust me - it looks fabulous. And I think these illustrations are really beautiful. (I love red shoes.)
These are the pyramage cards, with four layers to each image. There are four designs in the pack.
But wait!
The leftover images from the pyramage cards....make the invertage cards.
I know it was late at night when I was putting these together, but I thought that was pretty clever.
The same four designs are repeated, and this time instead of the stepped card, you get a box and frame to put these in. Each box has a foldout piece on the back so it will stand upright, and a hook so you could even hang it on the wall.

I just love these cards, I think they're quite beautiful. After all the sweetness and light of Christmas, these monochrome cards with a splash of red look stunning.
I don't normally post about prices on the blog, but I just wanted to let you know that this kit which makes 8 cards is currently only £6.99, which I think is a real bargain.
Kate x
Labels:
box cards,
cardmaking,
cards,
hunkydory,
stepper cards
Subscribe to:
Posts (Atom)